Third-Party Plugin Developer Onboarding Publishing and Sales Guide
Contract Web, Plugin Store and Sales Web procedures for Developers and company representatives
1. Introduction
Portal Services by Gamanet brings together the online services that support your work with the C4 System—from deployment and licensing to updates, development, training, and maintenance.
Whether you are a developer, engineer, end user, or business partner, Portal Services helps you access the tools and services you need.
This guide walks you through the complete process, from signing your company´s contract to publishing and selling your Plugins.
Portal services, roles and Edu training
Use Contract Web to sign contracts, download certificates, and manage your company’s team and roles.
Use Plugin Store to manage C4 extensions and applications that run within C4 Simple Client, including third-party Plugins.
Use Sales Web to manage received orders and order activation keys for your Plugins.
Each role gives you access to specific actions in Portal Services. You can hold multiple roles to access all the actions you need.
Role |
Portal service |
Required Edu training |
|---|---|---|
Contract manager |
Contract Web |
Third Party Plugin Development |
Legal representative |
Contract Web |
- |
Development manager/ Plugin admin |
Plugin Store |
Third Party Plugin Development |
Developer |
Plugin Store |
Developer |
QA tester |
Plugin Store |
- |
Sales |
Sales Web |
- |
*The Development manager role is assigned in Contract Web. Plugin admin permissions are granted in Plugin Store.
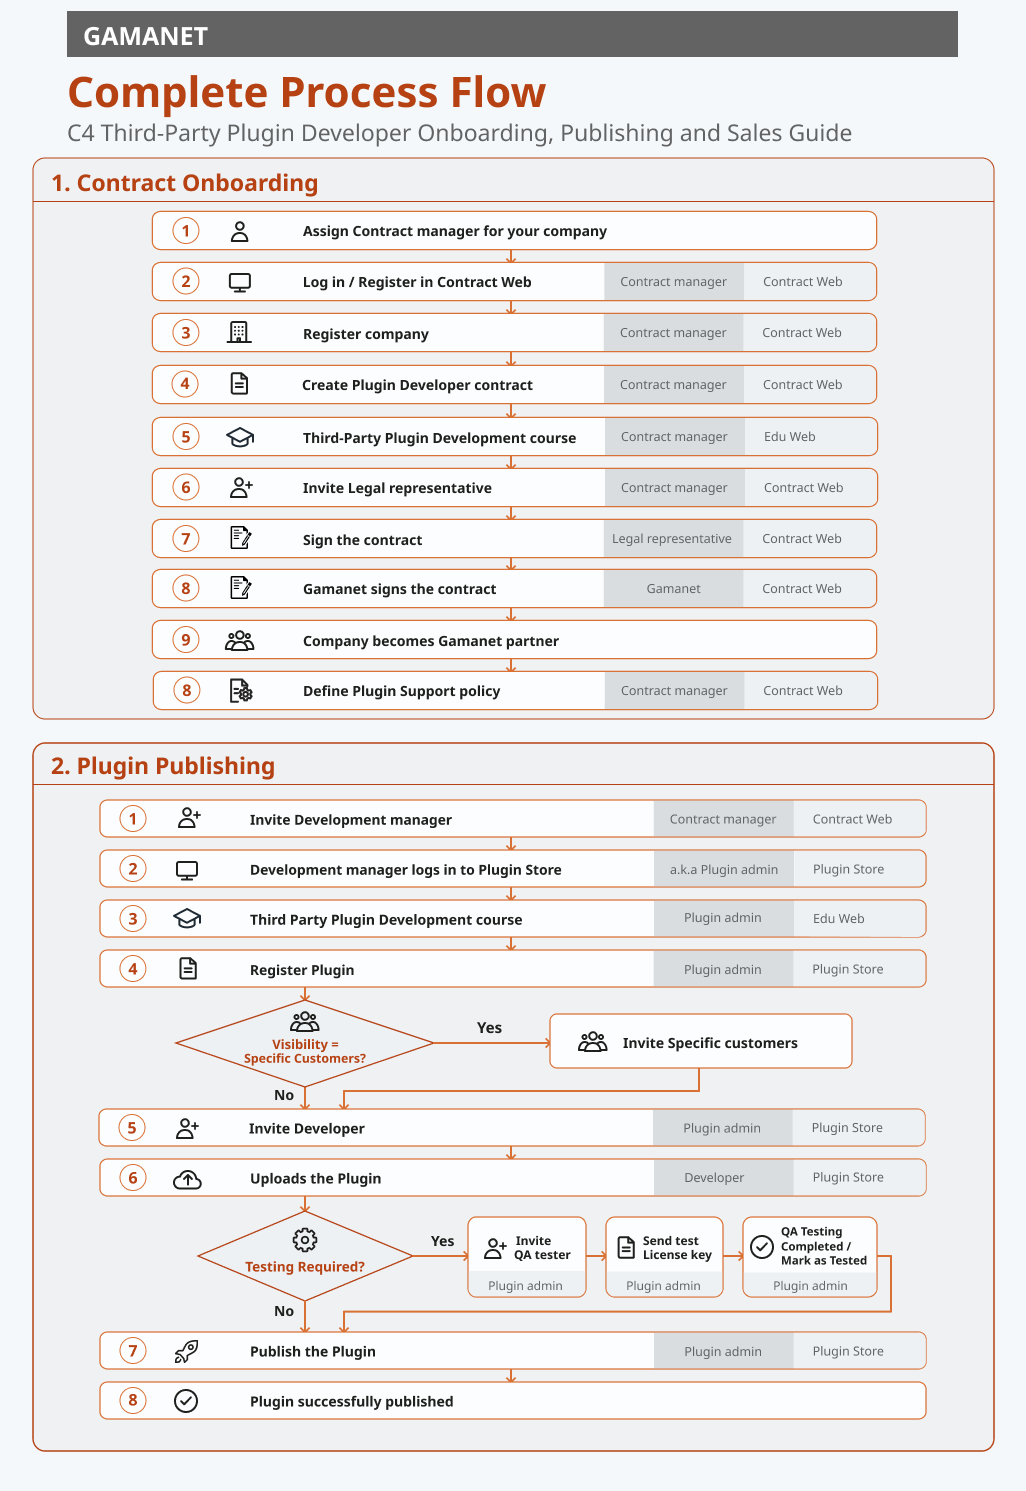
2. Sign the Contract
Gamanet works solely with legal entities or companies with which it signs contracts. This company guarantee the quality of its Plugin code and accepts full responsibility for any damage it causes.
Assign a Contract manager
Before the contract signing process, it is important to define a specific person who will manage the contract between the Third-party company and Gamanet. That person becomes a Contract manager for the company on the C4 Contract Web platform and gains access to a range of key features, including:
Setting up and managing company account
Overseeing the entire contract signing process
Inviting the Legal representative to review and sign contracts
Updating your company’s Legal representative when needed
Adding employees and assigning them appropriate roles, such as the Development manager role, which is responsible for managing Plugins in the Plugin Store
And much more to ensure smooth cooperation.
Log in to the Contract Web
To get started, the Contract manager opens Contract Web at: my.c4portal.com/contract/welcome.

The user clicks on Login in the upper-right corner or on Register button which is part of the Landing page.
An OAuth page appears where the user can create a new account using email, phone number with a country code, and password, or log in to an existing account.
The registration process includes email verification and number verification.
After completing account registration, the user is automatically assigned the role of Contract manager (without any prior invitation, contact, or engagement with Contract Web).
The user is then redirected to the Contract Web welcome page, where all relevant information about the Contract manager role is displayed.
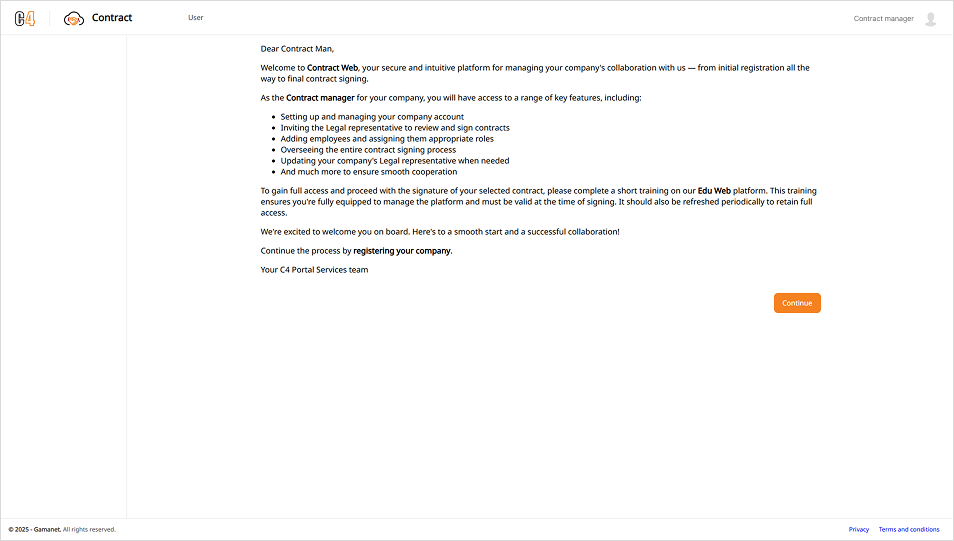
At the bottom of the page, there is an orange Continue button. Once clicked, the user gains full access to the Contract Web user interface.
Register your company
After clicking Continue, click Register in the upper-right corner and enter your company’s details.
Complete the required information:
Profile: Name- Company or legal entity name, Street- Street address, ZIP- Postal/ZIP code, City- City or town
Payment: Corporate ID- Company registration number, Tax ID- Taxpayer identification number, VAT ID- VAT registration number, VAT is applicable and cannot be decline, Bank account (IBAN)- Company bank account details in IBAN format.
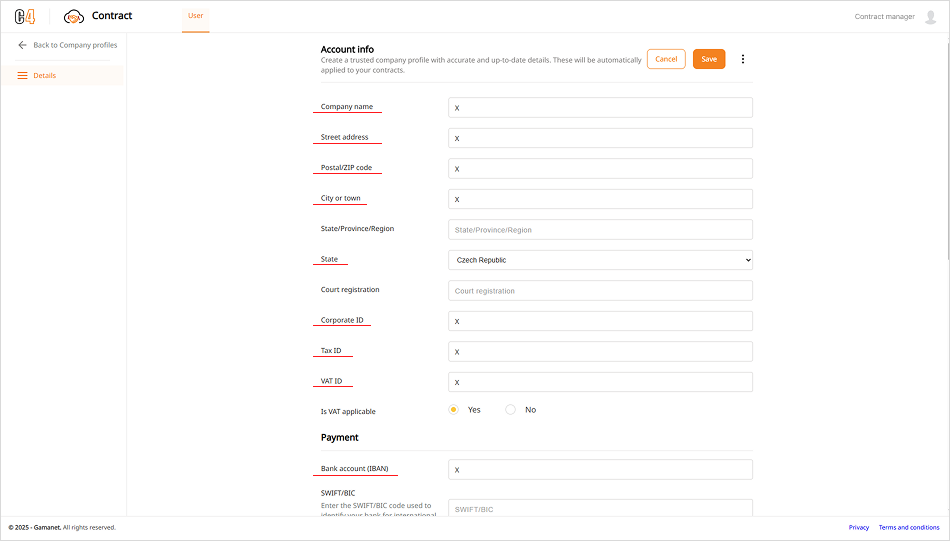
After completing all required fields, click Save. The Contract manager can now access the Contracts section.
Create a Contract
In the Contracts tab located in the left navigation column, the Contract manager can create a new contract by clicking on New Contract button.
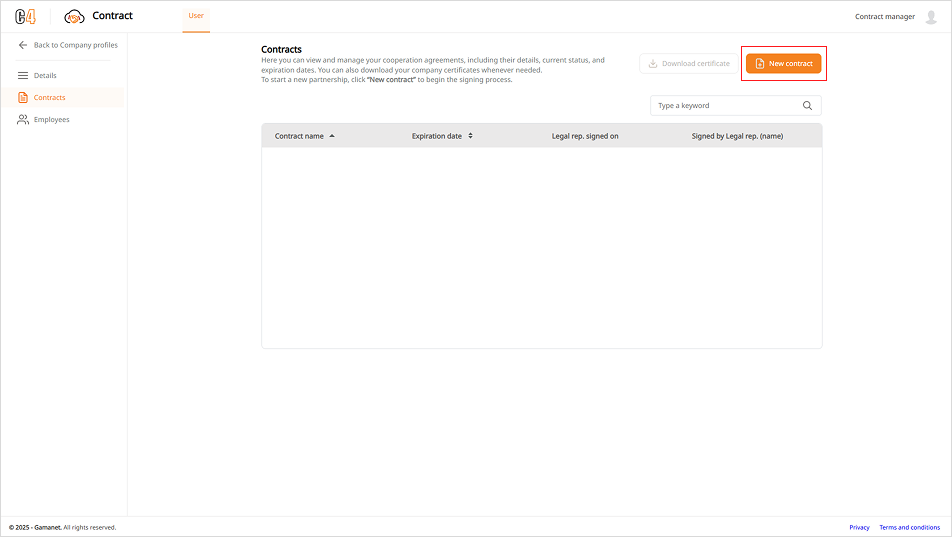
Choose the agreement you need from the available templates:
Business Partner
Plugin Developer
To develop and distribute Plugins, select Plugin Developer and follow the guided steps.
Before proceeding, the selected contract template can be previewed in the left corner of the screen. This allows the user to carefully review all contract details and ensure that the information is accurate and complete. This step represents the final opportunity to make any changes.
Once the Next button is clicked and the contract is submitted, no further edits are possible.
Edu Training Validation
Before the contract can be signed, the system checks whether the Contract manager has valid Edu training.
For the Plugin Developer contract, the required course is Third-Party Plugin Development. If the training is expired or not yet completed, a reminder appears.
Click Continue and complete the training. Assigning the completed course to the person can take up to 5 minutes. If the training is valid, the process continues automatically.
Invite the Legal representative and sign the contract
The next step is assigning the Legal representative for the company. The Contract manager can invite them by filling in their email address and sending an invitation email. They will receive an email with a link valid for 2 weeks.
They must click the link and log in or register via OAuth, as required for all Portal Services users.
After logging in, they are automatically assigned Legal representative role (the role assigning process takes up to 5 min). They can then review the contract and click Sign in the upper-right corner.
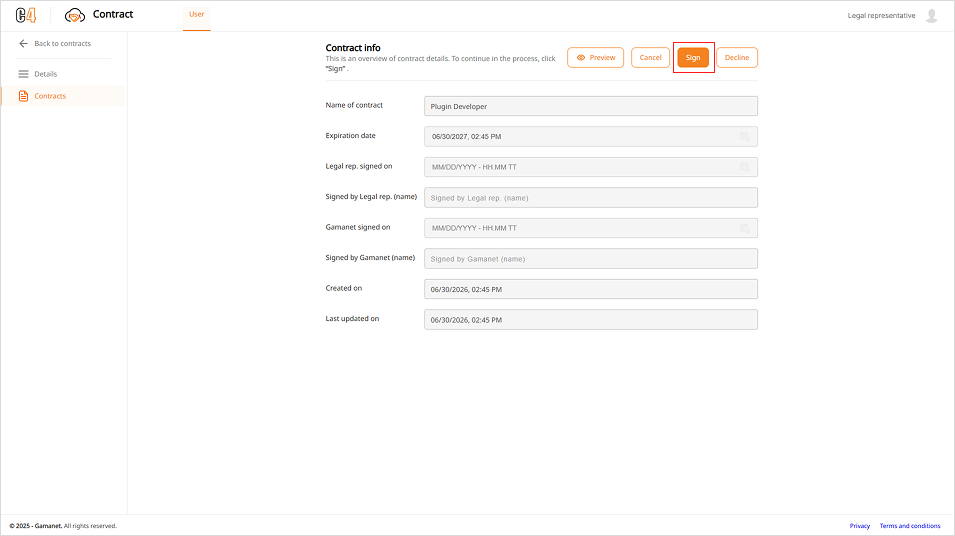
Once the Legal representative signs, the contract is sent to Gamanet for signature.
After both parties have signed, the Contract manager and Legal representative receive the valid contract by email in PDF format.
Your company is now a Gamanet partner.
Define Plugin Support policy
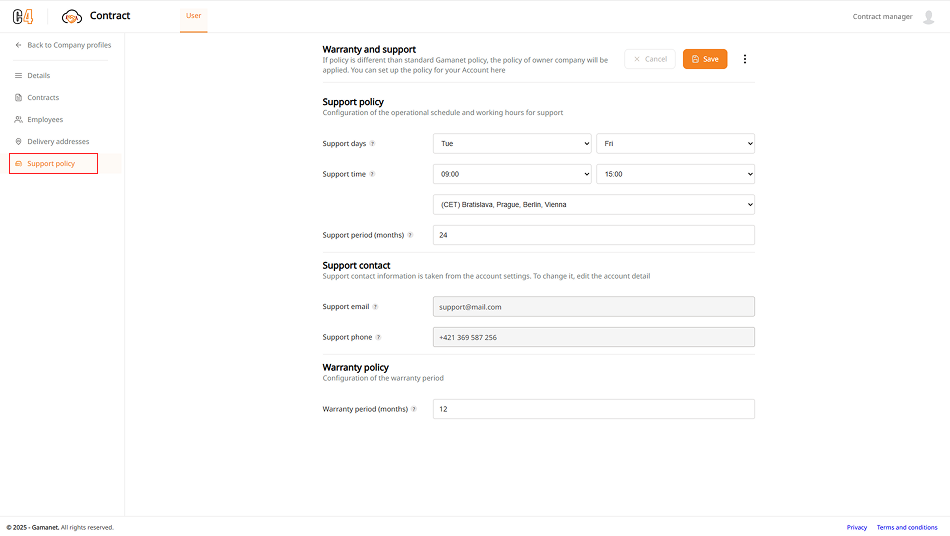
Before continuing, define your support and warranty terms in Contract Web. Once your contract is signed by both parties, open Support policy in the left-hand menu.
These terms appear on your Plugin’s details page in Plugin Store for customers to review. You can use this policy as a template for your Plugins and adjust the terms for individual Plugins in Plugin Store.
3. Publish the Plugin
Assign a Development manager
Choose the person who will be responsible for managing your company’s Plugins. In Contract Web, this role is called Development manager. Once your company has an active, valid contract, the Contract manager can invite this person as an employee.
Open Employees in the left-hand menu and click Add employee in the upper-right corner. Select the Development manager role, enter the person’s email address, and send the invitation.
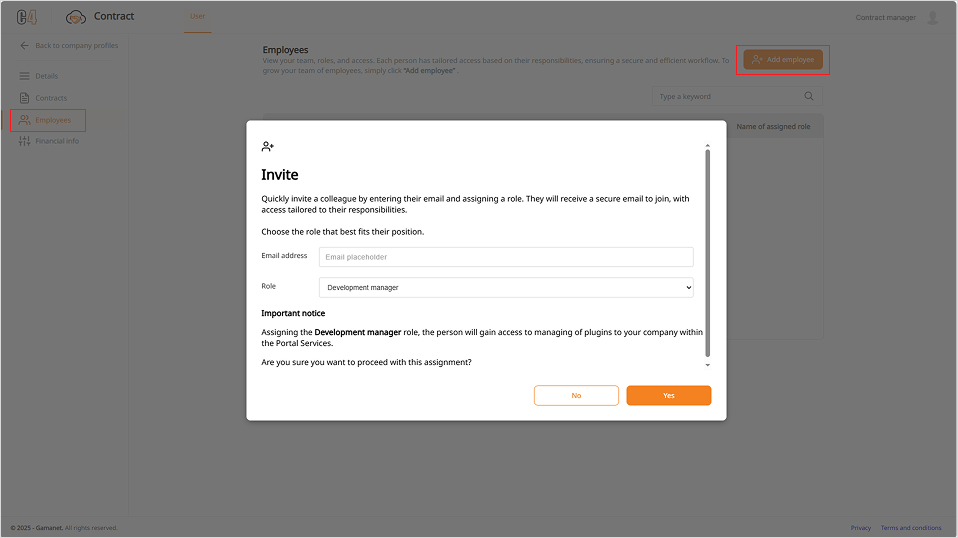
The invitation link is valid for 2 weeks. To accept, the invited person opens the link and logs in or creates an account. Once they accept the invitation, they are assigned the Development manager role. This takes up to 5 minutes, during which access may be temporarily limited.
When they log in to Plugin Store: https://my.c4portal.com/pluginstore/public/user/home, the system automatically checks whether they have valid Third-Party Plugin Development Edu training. If the training is valid, the system grants them Plugin admin permissions. After that they can manage your company’s Plugins.
Register your Plugin
The Plugin admin will see a User item in the top menu, which allows them to manage the Plugins developed by Developers for the company they represent. This means they can register Plugins and manage their entire lifecycle—from initial deployment into the system, through management of support and warranty settings, to overseeing new versions and deactivate them when needed.
To register a Plugin, click New Plugin in the upper-right corner and complete the required information.
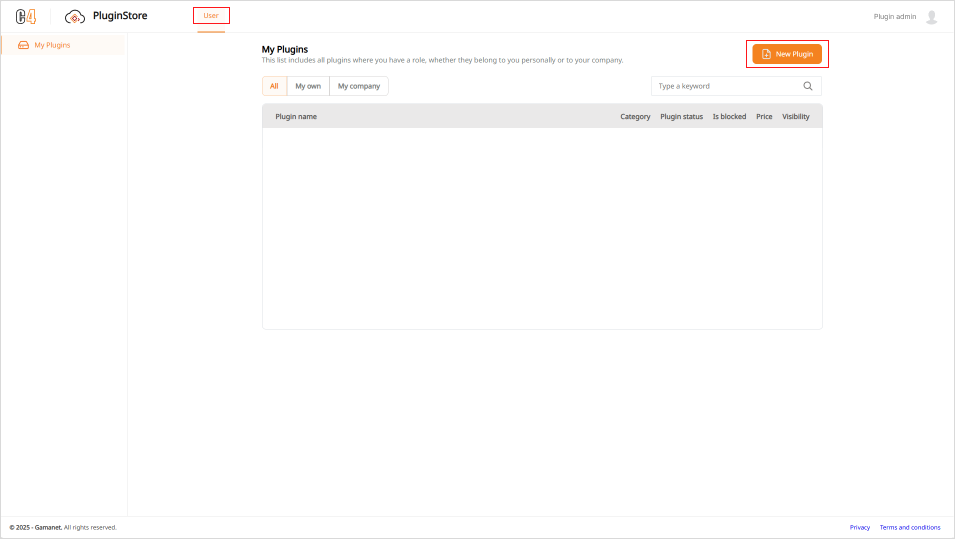
Pay particular attention to these fields:
Plugin category, Owner of Plugin and Price: check that each value is correct.
Plugin additional info description: this appears on the public Plugin Store page. Use it to explain what your Plugin does and how it helps customers.
Plugin Policies: specify whether your Plugin uses the same support and warranty terms as Gamanet. If your terms differ, use your company’s Plugin Policy template from Contract Web, or define custom terms in Plugin Policy in the left-hand menu after registration.
Visibility: choose Public to make the Plugin visible to everyone, or Specific customers to make it visible only to selected customers.
Certification is required: indicate whether you plan to have your Plugin certified in the future. Certification is not required to publish your Plugin.
Testing requirement: choose whether testing is required before publishing, based on your company’s needs. The first version of every Plugin must always be tested.
Allow QA tester to publish: grand your trusted tester permission to publish the Plugin after successful testing
The Plugin admin can update the Plugin information throughout its lifecycle.
Invite specific customers
If you select Specific customers under Visibility, a Plugin Access section appears in the left-hand menu after you save the Plugin information.
Open Plugin Access and click Invite to invite a customer. They receive an email invitation, which they need to accept within 2 weeks to access the Plugin.
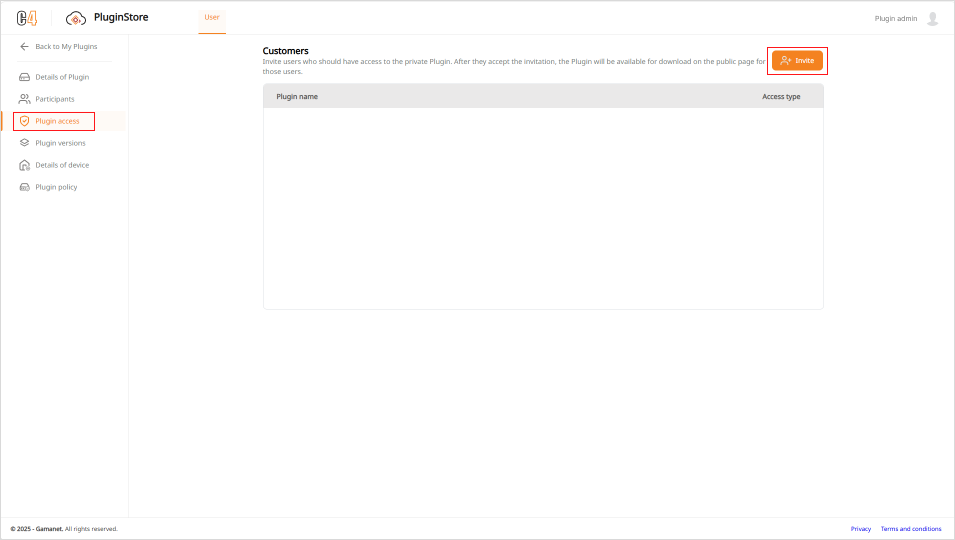
Once the customer accepts the invitation and the Plugin is published, they can download it from Plugin Store.
Invite the Developer
After saving the Plugin information, the Plugin admin must invite the Developer who will upload the Plugin to Plugin Store.
The Plugin admin invites Developers who develop the Plugin and have a contractual relationship with the company represented by the Plugin admin.
In the Participants section, use the orange Invite button.
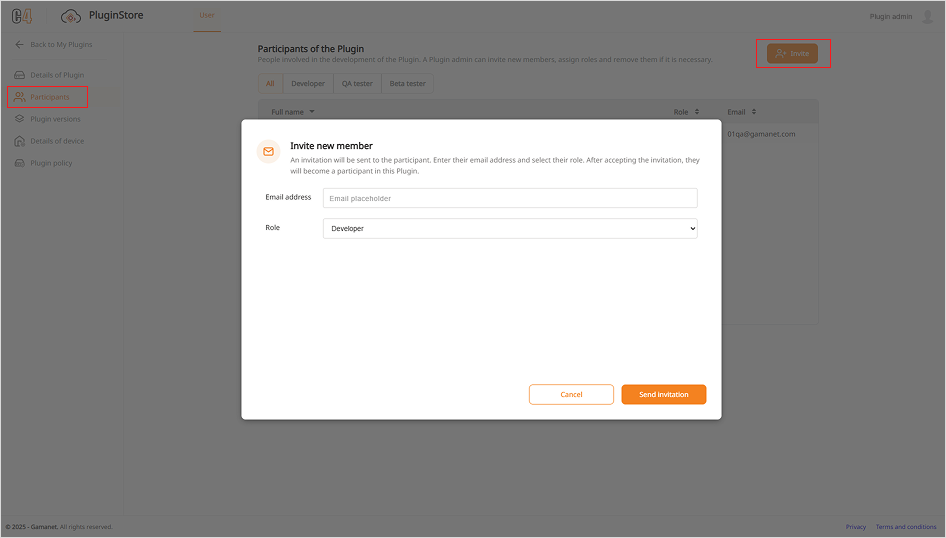
The invited person receives an email with an invitation link valid for 2 weeks. To accept, they open the link and log in or create an account. After accepting the invitation and logging in, they are automatically assigned the Developer role and gain access to the Plugin in the Plugin Store.
Upload the Plugin
The Developer can upload the Plugin to Plugin Store only with valid Developer Edu training. If it is missing, the system automatically displays a notification with a link to the course in question.
Once logged in to the Plugin Store, the Developer needs to go into Plugin versions in the left-hand menu. Click Upload New Version in the upper-right corner and follow the steps to upload the Plugin.
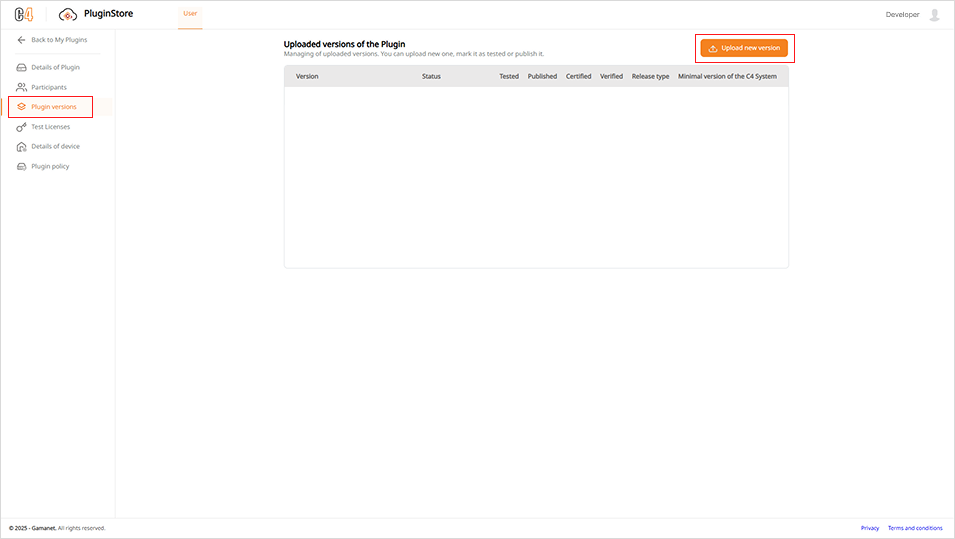
Pay particular attention to these requirements:
Uploaded package: use the .c4plugin format. The Plugin name in the package must match the name in the Plugin Store record, and at least one category in the package must match a category defined in that record.
C4 License ID: use the same ID for all versions of the Plugin. This ID is required for publishing.
Release type: select Release for a production version or Beta for a version intended for testing.
The Developer can upload new versions but cannot edit the Plugin’s details. Once the upload is complete, the Plugin admin receives an email notification.
Test the Plugin
The Plugin admin must invite a QA tester in the Participants section to test the first version of every Plugin and any later versions that require testing according to the Plugin settings.
The Plugin admin then sends the QA tester a test license key. To send it, open Test Licenses in the left-hand menu, select the QA tester from the invited participants, and click Send to selected. The key is valid for 2 weeks and can be resent if needed.
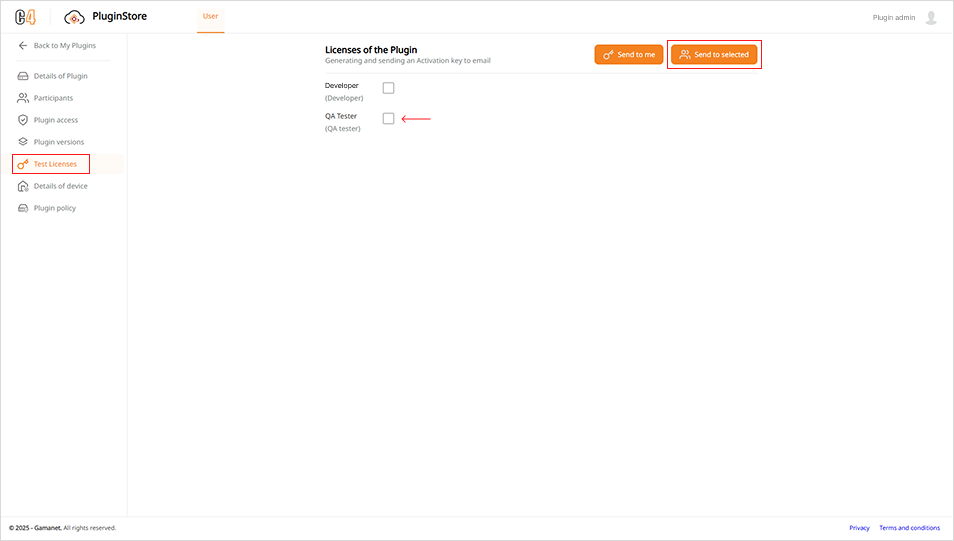
The QA tester receives two emails: an invitation to test the Plugin and a separate email with the test license key. Once they accept the invitation, they can access the Plugin and begin testing.
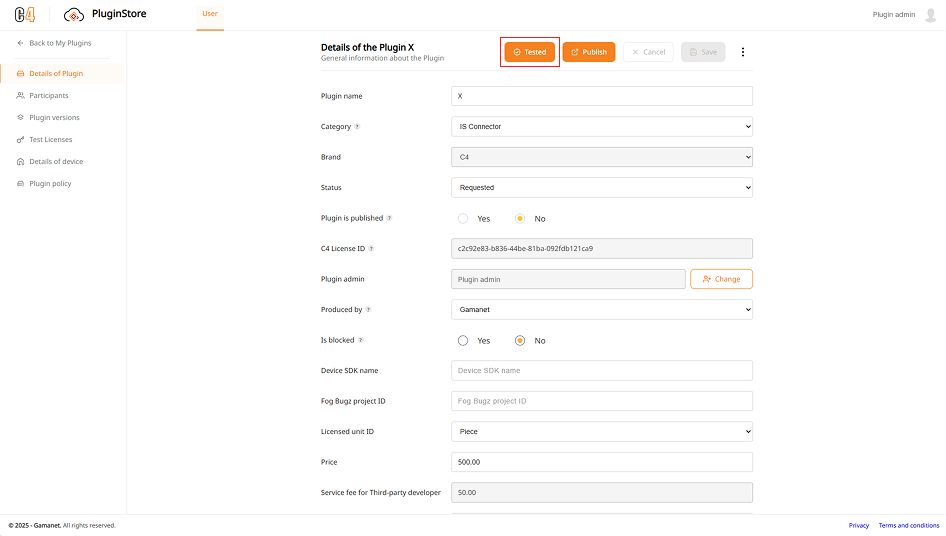
After successful testing, the QA tester or Plugin admin mark the Plugin as tested in Details of Plugin or in the Plugin version.
Publish the Plugin
Once the required testing is complete, the Plugin is ready to be published, either publicly or for a specific customer. Later versions can be published without testing if testing is not required in the Plugin settings.
The Plugin admin can publish the Plugin or grant the QA tester permission to do so.
To do so, open the Details of Plugin and click Publish in the upper-right corner, above the Plugin information.
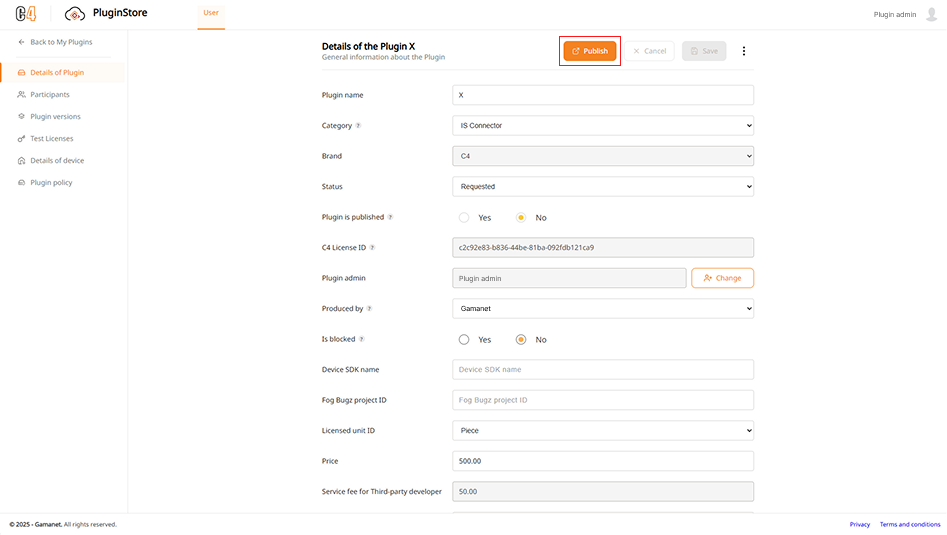
Now your Plugin has been successfully published!
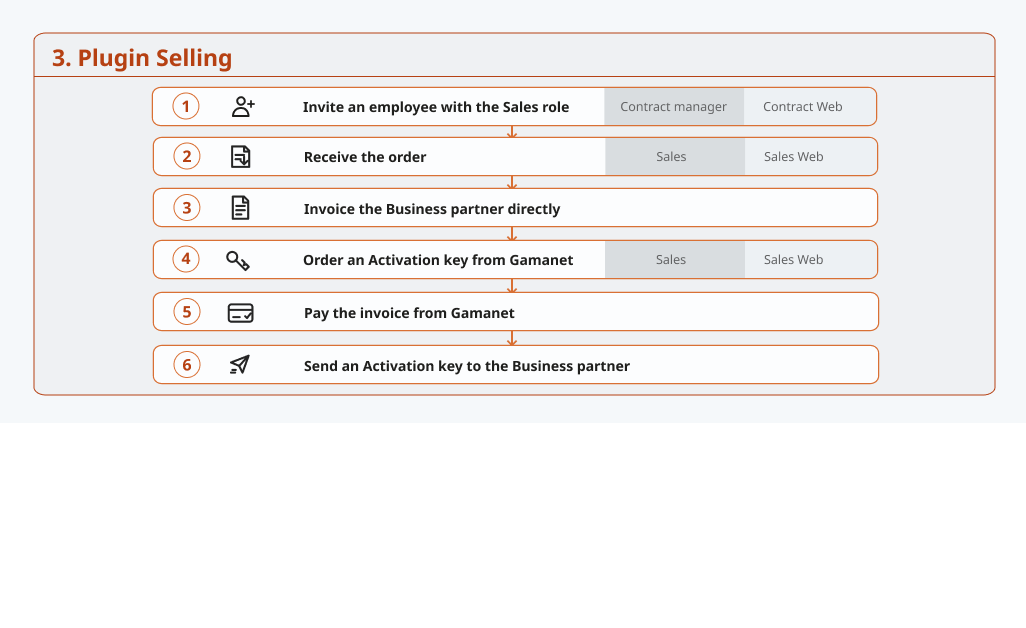
4. Sell the Plugin
Your Plugin has been successfully published in Plugin Store. To receive and manage orders, complete these steps in Contract Web:
Assign the Sales role: The Contract manager invites an employee with the Sales role to manage orders for your Plugins in Sales Web.
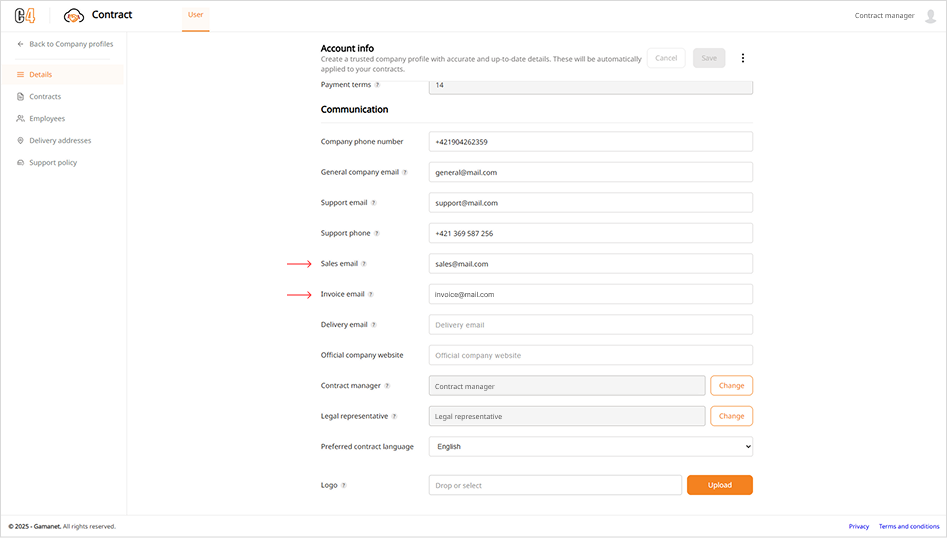
Check your contact emails: In the Contract Web, open Details and enter a Sales email to receive orders and an Invoice email to receive invoices from Gamanet.
Send an invoice to the Business partner
When a Business partner orders your Plugin through Sales Web, you receive a notification at the sales email address specified in Contract Web. Click the link in the email to view the order details, or open Sales Web: my.c4portal.com/sales/welcome and select Received orders.
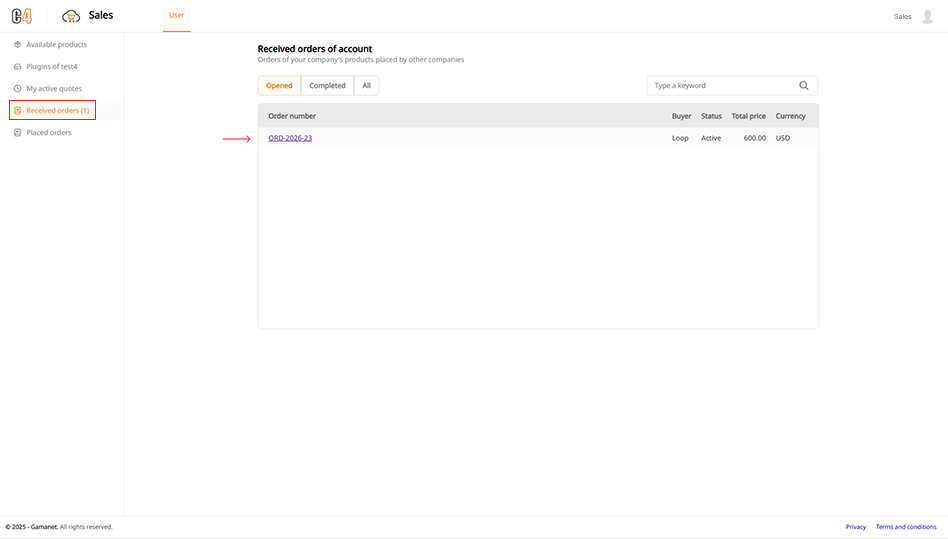
Invoice the Business partner directly for the ordered Plugin licenses. Include your company as the supplier and provide your payment details. The Business partner then pays the full amount directly to your company.
Order an Activation key from Gamanet
To obtain an activation key for the Business partner’s Plugin, an employee with the Sales role needs to place an order with Gamanet. Open Received orders, click the order number. In the Order Detail select Order Activation key.
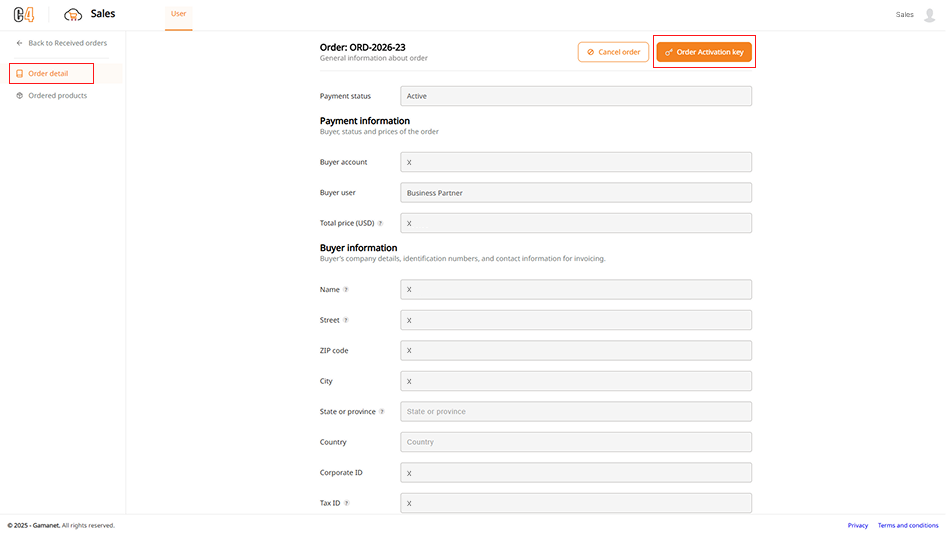
Gamanet will send you an invoice. Once payment is received, your activation key will be available in Placed orders. Open the order number and go to Activation pack to find the key, then send it to the Business partner.
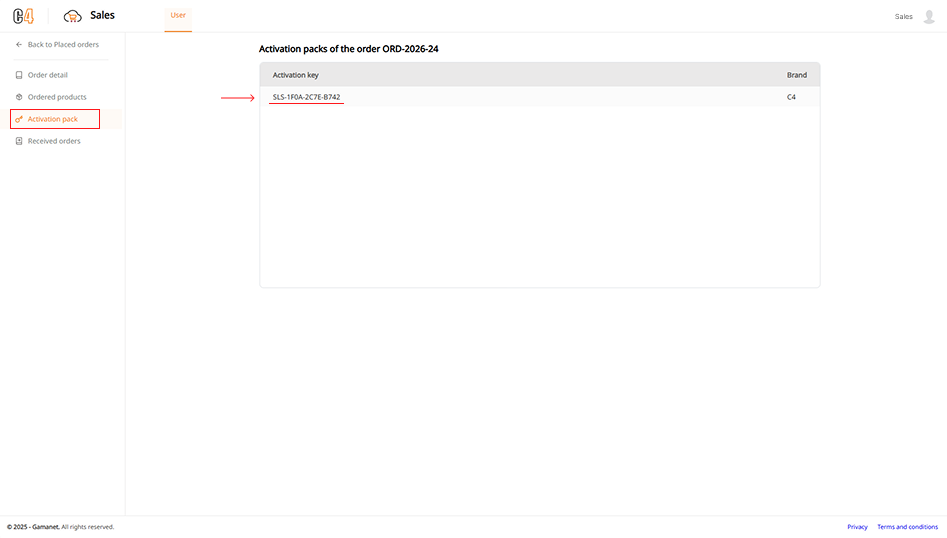
Your Plugin sale is complete!